The small size belt is about 30 inches from the first to the last concho. The medium size is about 40 inches from the first to the last concho. The large size is about 50 inches form the first to the last concho. This type of belt looks great prairie style skirts.
Materials - These materials are usually found in hobby and leather working stores.
1.¹⁄₈ 1 spool of leather - 25 yards long x inch wide
2. Conchos - slotted type - the slots in the conchos need to be about one half inch in diameter because 10 leather cords will be going through them. If the holes are smaller the four cords in the center of the design can pass behind the concho and the others go through the slots.
Small size - 4 conchos Medium size - 5 conchos Large size - 6 conchos
3. Pony beads - Small size 132 Medium size - 156 beads Large size 180 beads This is the number of beads required to complete the pictured belt. There is always room for artistic expression, be aware that adding beads will make the belt heavier.
4. small ruler for spacing the beads
Instructions
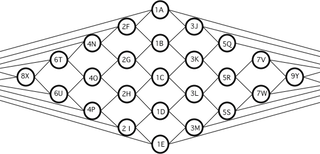
1. Lay the beads out according to the diagram. Arranging the beads on the sticky side of a wide piece of masking tape to keep them in order.
2. Cut½ the leather in 10 lengths 2 yards each.
3. Medium size - slide a concho to the exact center of the leather strips. It is easier to work with one or two pieces at a time. Keep the leather as flat as possible. Go to Step 5.
4. Large and Small sizes - the center of the belt will be beads. Starting with Bead 1A run two pieces of leather through until the bead is in the exact center of the strips. Run the next two pieces of leather through Bead 1B. Continue with the other beads in that row (1C, 1D, 1E) until all five beads have two pieces of leather through them.
Lay the beads and leather in the order of the design for Row 1. Start on Row 2, take the lower piece of leather from Bead 1A and the upper piece of leather from Bead 1B. Lay the two pieces together making sure there are no twists. Run the two ends through Bead 2F. Slide this bead up the leather until it is one half inch from Beads 1A and 1B.
Take the lower piece of leather from Bead 1B and the upper piece from Bead 1C and slide Bead 2G into place. Continue adding the beads according to the pattern being careful not to twist the leather strips.
Add conchos to both sides of the beaded work, position the edge of the concho one half inch from the last bead. Slide as many pieces of the the leather through the slot as possible starting with the outside strips first. Take care to keep the leather flat. It is easiest to work with one piece at a time.
Some conchos have larger slots than others, if all of the leather strips won't fit leave the center pieces undone to lay behind the concho. When starting the next bead pattern do not pull these strips too tight or the belt will not lay flat.
5. All sizes - The next bead patterns will start with either Bead 8X or 9Y. Choose the leather strips that are close to the center for the first beads and work out to the edges.
6. End the design with a concho on each side. Try the belt on to see how long the tails are. If desired they may be shortened. The tails of the belt in the picture were finished with a knot about 6 inches from the end, then three beads and another knot. A drop of seam sealant like Fray Check can be used on the final knot.
This belt can be customized in many ways. The beads can be closer together. There could be two beads at each position. There can be more beads on the tails. Remember that adding beads adds to the weight of the belt. To make a longer belt more than one spool of leather would have to be used. The pattern could be made wider with more leather strips if the slots in the conchos will accommodate the bulk, or the extra leather could be run behind the conchos.