
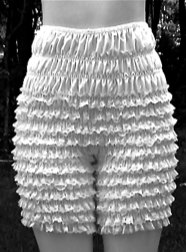
The bottom line in a coordinated ensemble is matching pettipants. They can be made from the same fabric as the dress. This is an easy project but will take some time due to the repeated rows of stitching and the hand winding of the elastic thread on the bobbins. There are many variables in this project so adjust as you go.
Materials
1. Approximately one yard of 44 inch fabric - light poly-cotton, cotton or polyester fabric.
2. Elastic thread - get a new spool. Elastic thread is especially prone to aging.
3. Elastic for waist band usually ½ inch
4. thread to match or contrast with fabric
5. lace - optional - From no lace to all over lace. Use flat lace, the pull of the elastic thread will cause the lace to ruffle. Use sturdy lace as it will be sat on and washed frequently.
6. pattern paper - Found in the interfacing section of the fabric store. It makes creating patterns easier because it is marked with blue lines like graph paper. One yard should do.
7. pants pattern to fit the wearer
Instructions
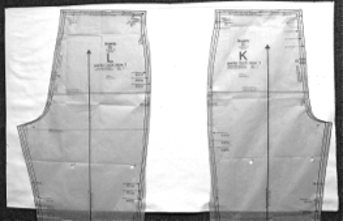
1. Make a pattern Lay the pattern on the pattern paper with the crotch curves facing away from each other. Adjust the pattern so that the ‘lengthen or shorten here’ lines are on the same line of the pattern paper. Position the pattern pieces so that they are 4 to 6 inches apart. This allows the pettipants to be pulled on over the hips. Draw a line between the center front and center back. Adjust the leg length, usually 5 to 6 inches for mid thigh. Cut the pattern out.
2. Cut out your fabric. If the total length of the pattern from the top of the back waist to the bottom of the leg is not over 22 inches, the pattern can be laid out sideways with the bottom of the leg on the selvage edge. This will 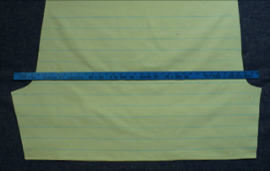 save having to make a hem on the leg. The selvage edge is usually not used in garment construction because it shrinks. In this case a little shrinkage will not be noticed, and is outweighed by the advantage of a finished edge.
3. Mark the lines that will be used to guide the elastic and lace application. Mark the lines on the right side of the fabric because the elastic thread will be in the bobbin. Take a yard stick and make lines 1 or 1½ inches apart up almost to the top. Don’t use air erasable marking pens because this project will take a while and the marks may vanish before it is done. Test the marker on a piece of fabric. Some markers will not wash out of some fabrics.
4. Sew the front seam, just the front, from waist to crotch.
5. Lace - How much is a matter of choice. Use the lines for placement. If this is not enough, more can go between the lines. When the center seam is reached just run the lace across from one side to the other. Use a 7 stitches per inch (4.0 mm) stitch length. Longer stitches sew faster and reduce puckering in trims.
6. Elastic thread - The sewing machine manual will tell you how to use elastic thread in the machine. Look under smocking. The general directions are;
(a) Wind the elastic thread on the bobbin by hand. It needs to be smooth but not tight. Keep the tension even on the winding. At least two bobbins of elastic thread will be needed.
(b) The tension on your bobbin case must be changed or by-passed. Before changing the tension on the bobbin case very carefully mark the position that the screw is in now. Use a fine point permanent marker to make a small dot on the screw and the bobbin case. Loosen the screw about a quarter turn.
(c) If it is a drop in bobbin, without a bobbin case, the tension can be 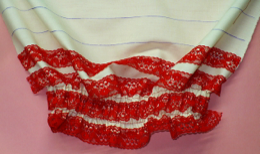 bypassed by not putting the elastic through all the thread guides. See the machine manual.
(d) Practice on a large scrap to see the effect. Make several rows. When sewing rows side by side, the material must be pulled to keep it flat so the gathering is even.
7. Start sewing - Sew on the right side of the fabric. Pull a long tail of elastic thread, about 3 inches. Make sure that the elastic does not pull out of the stitching. Always back stitch several stitches at the beginning of each row. Use a long stitch 5 mm or 5 stitches per inch. When the center seam is reached, just sew across like you did the lace. Back stitch several stitches at the end of each row. Leave long thread tails. Do not get discouraged. The first few rows of stitching will not look like much. It takes several rows to get the full effect. Stitch on the lines, and if that does not gather the material to your liking, then make more rows of stitching between the lines. Stitch along the top of the lace to pull it in. If the lace is wide, it can can be folded up and stitched under. The stiffer the fabric, the more elastic will be needed. Don’t worry if the lines are not exactly straight. No one should be looking that closely at your pettipants.
8. IMPORTANT - Reset your bobbin tension to the original setting.
9. Sew the back crotch seam and the leg seams with 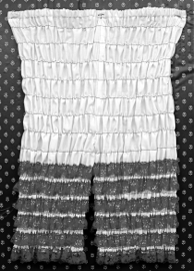 regular thread. Be sure to catch all of the elastic threads in these seams. Sew twice. You don’t want those elastic threads popping loose. Press open the front and back seams down to the last row of stitching. Tuck a 2 inch strip of fuse webbing under each seam allowance and press. This will keep the seam allowances in place when you insert the elastic.
10. Fold the top over one inch to make a tunnel for some ½ inch regular elastic. Sew ¾ of an inch down from the top edge all of the way around. At the back seam on the inside of the casing make two bar tacks. To make bar tacks set your stitch length on zero and your stitch width (zig zag) wide. Position the opening of your presser foot across the back seam line on the top edge of the tunnel and sew 8-10 stitches. Then do the same at the stitching line of the tunnel. With your seam ripper, pick open the stitches between the bar tacks. Insert your ½ inch elastic through this opening. Before you start the elastic, trim the corners of the leading edge to a more rounded shape. It will slide through easer and twist less.
11. Try the pettipants on before you cut the elastic. It does not have to be tight to the waist. The gathering of the fabric will cause the pettipants to shorten a little. It is fine if your pettipants are a little bit hip huggers. That will be one less elastic on the waist.
12. Steam the pettipants. This sounds funny, but to make the elastic thread gather up just hold your steam iron about half an inch above the pettipants and blast the steam button. This is fun. It will shrink up before your eyes.