
The ever popular Bandana Print Kerchiefs can be used in many ways.
These instructions make a prairie type skirt that is about 29 inches long at the points and 26 inches long between the points. The circumference of the body of the skirt is about 84 inches. If you want a fuller skirt just add two more bandanas, one for the body and one for the ruffle. This will make the skirt about 21 inches larger.
Materials 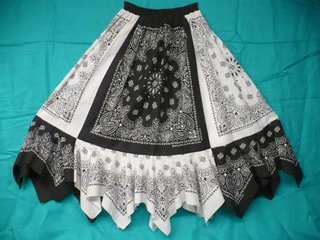
1. 8 large bandanas approximately 22 inches square, the design is square - the fabric is not always square, check them carefully for flaws before buying.
2. fabric and elastic for a waist band
3. compass to draw a circle
4. piece of light cardboard
5. fabric marker
Instructions
1. Wash and machine dry the bandanas. This will remove the sizing that can cause skipped stitches and will shrink the fabric.
2. Iron the bandanas. Take the four that will be the ruffle and iron them in fourths. This will mark the exact middle of the fabric which may not be the middle of the print.
3. With your compass set draw a 6 ½ inch diameter circle on your cardboard. Cut it out. Put a pin through the center of the circle and through the center of the creased bandanas. Mark around the cardboard circle.
4. Sew around the marked circle with a short stitch length. Don't back stitch, over lap the ends of the stitching. 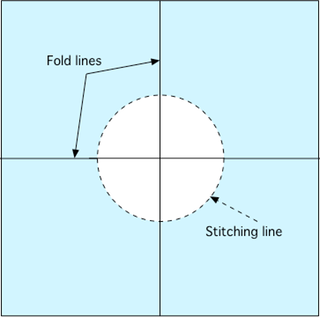
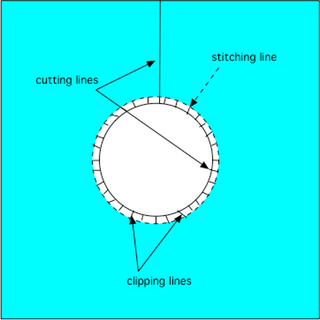
5. Cut down one of the creases through the stitching and around the inside of the circle. Cut ¼ inch inside the circle from the stitching.
6. Clip the inside curve up to the stitching line. This is not an option. You must clip right up to the stitching threads in order to get this line to lie flat and attach smoothly to the body of the skirt. If you accidentally clip the stitching thread just sew that area just a little bit to the outside of the original stitching. A pair of small scissors with sharp tips is necessary. Clip every ¼ inch.
7. Sew the four bandanas of the body together. Use the zipper foot and sew right next to the rolled edge. This edge will keep the fabric from raveling.
8. Sew the sections of the ruffle together with a quarter inch seam. Right sides together matching the edges that were cut along the fold .
9. Pin the ruffle to the body matching the seams. Match the cut edge of the ruffle to the rolled edge of the body.
10. Sew the ruffle on. Use your zipper foot and sew just a little bit to the outside of the stitching line on the ruffle.
11. Dot a little seam sealant (Fray Check) on the corners of the ruffle and allow it to dry completely. Then trim the corner threads.
Elastic Waistbands
Elastic waistbands are usually more potluck forgiving and easy to alter. The main problems with elastic waistbands are that they can be lumpy and tend become twisted. The reason for some of these problems is that the length and thickness of the fabric. The fabric of the waistband must be long enough to go over the hips and then when all of that fabric is pulled in to fit the waist it is too thick and forms lumps. An elastic waistband can not always be made out of the same fabric as the skirt. If the skirt is of a thicker or stiffer fabric, a matching or contrasting waist band can be made from lighter weight fabric. This will reduce a lot of the bulk around the waist.
There are many ways to make an elastic waist band. Try one of these ideas.
Triple Elastic Waistband
These instructions are for a 2 ¼ inch wide waistband. The instructions for a 1 ½ inch waist band are at the end of this section.
Materials
1. Fabric for waistband - Long enough to go around hips plus two inches for ease by 5 ½ inches wide.
2. Elastic - ½ inch wide by 3 times the waist measurement.
3. A small amount of fuse web such as Stitch Witchery ©.

Instructions
1. Sew the short ends of the fabric together to make a circle. Press the seam open. Place a small piece of fuse web under the seam allowances as they are pressed open. This will keep them in place when the elastic is being drawn through. Fold the fabric in half lengthwise and press a sharp crease.
2. Set the sewing machine for a longer stitch length (4 mm or 15 spi). Edge stitch fraction of an inch from the fold all the way around the waistband. There are several special feet that can make this easier. Adjusting the needle position can result in more accurate sewing.
3. Sew completely around the waistband lengthwise three more times. The first line of stitching should be ¾ inch down from the edge stitching. To keep the stitching even mark the bed of the sewing machine. A piece of tape can be used as a guide. If the machine has a free arm place a fat rubber band around the arm to act as a fabric guide. Or the quilting guide can be used.
4. Bar tack on top of the stitches at the cross wise seam of the waist band make a being sure that the bar tack cross the seam. A bar tack is made by setting the stitch length to zero and the stitch width on a wide zig zag.
5. Sew the waistband to the top of the skirt with a ½ inch seam.
6. Pick open the cross wise seam between the bar tacks on the inside of the waistband. Use the seam ripper to open the seam. The bar tacks will prevent the seam from opening too far.
7. Cut the ½ inch elastic in three pieces. Each should be a little longer than waist length. Insert the elastic into the channels in the waistband.
8. Put the skirt on inside out and adjust the elastic to fit. The ends of the elastic can be over lapped and sewn or tied in a knot.
For a 1 ½ inch waist band the instructions are the same except the waistband fabric is 4 inches wide, the channels are ½ inch wide and the elastic is ¼ inch wide.
Single Elastic Waistband
When making an elastic waistband there are some ideas that will make it easier.
1. Wider elastic is more comfortable than a single row of narrow elastic. Wider elastic also has more strength to prevent the square dance skirt from spinning around the waist. For elastic that is ¾ inch or wider always use elastic that is marked ban-roll or non-roll. This elastic has cross wise ribs that keep it from bending in half when stretched.
2. To determine the width of the fabric to be used in the waistband add the width of the elastic, plus ¼ inch for ease, plus ½ inch for seam allowance then double this number. To determine the length of the waistband add 2 inches to the hip measurement plus seam allowances.
3. Fuse web ironed in place under the seam allowances will keep them in place when the elastic is pulled through.
4. When making a waistband always edge stitch the top fold and stitch the bottom of the casing. The edge stitching will make the waist band sharper and the elastic will be less likely to roll. Stitching the bottom of the casing prior to attaching the skirt will prevent the layers from shifting and make attaching the skirt easier.
5. Once the elastic is adjusted to the wearer, sew across the width of the waistband in 3 or four places to prevent the elastic from shifting and rolling.
6. The fabric must be light enough to gather on the elastic. If the waist band must be made of a thicker fabric some of the bulk can be reduced by making the inside of the waistband from a lighter fabric.
a. Decide on the width of the elastic to be used.
b. To determine the width of the outside fabric, add the width of the elastic, plus ¼ inch for ease, plus 1 inch for seam allowances. The inside fabric the same width.
c. The length of the waistband fabric should be the hip measurement, plus 2 inches for ease and enough for seam allowances.
d. Sew both pieces into circles. Press the seams open. Place a small piece of fuse web under each seam allowance.
e. Place the circles right sides together and sew a ½ inch seam length wise. The width wise seam allowances should be off set, rather than on top of each other, to further reduce bulk. Trim the length wise seam allowance of the inside fabric in half.
f. Press the length wise seam allowance toward the inside fabric and under stitch. This will cause the 'turn of the cloth' effect and prevent the inside fabric from showing on the out side.
g. Fold the waistband in half length wise, press and edge stitch the fold. This will help to prevent the elastic twisting in the casing.
h. Measure the width of the elastic plus ¼ inch from the edge stitching and sew around the waistband. It works better to sew this line before attaching the waistband to the skirt, it will keep the waistband smoother.
i. Make a bar tack at the edge stitching and at the other stitch line. Be sure that the bar tack crosses the width seam.
j. Attach the waistband to the skirt.
k. Pick open the seam between the bar tacks and insert the elastic. Put the skirt on inside out and adjust the elastic for comfort. Then overlap and sew the elastic ends together.