Why are so many experienced stitchers afraid of the ruffler?
Is it the funny shape? The little knobs?
Or is it the funny noise it makes?
Be brave, be bold and give rufflers a try!
Rufflers don’t actually make ruffles, they make a series of little pleats. They are much better than the pulled string system of gathering. Consistent neat pleats that sew to the next piece of fabric with a nice flat seam. Years ago rufflers were a standard attachment on all sewing machines.
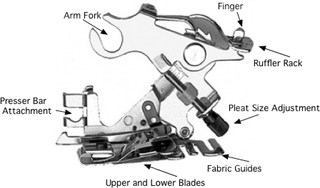
Presser Bar Attachment -Wraps around the presser foot bar. For a machine with snap on presser feet, unscrew the ankle from the presser foot shaft.
Arm Fork - This fits over the needle clamp bar. Give the needle screw an extra quarter turn to tighten. The vibration of the fork arm tends to loosen the needle. Make sure the needle is threaded before attaching the ruffler.
Finger - Fits through the slots on the Ruffler Rack - Lift and slid the rack from side to side to adjust the number of ruffles. With the finger in 1 a tuck will be formed every stitch. In 6 it will be every sixth stitch. In 12 it will be every twelfth stitch and in the star position it will not ruffle at all.
Pleat Size Adjustment - Determines the depth of the little tucks. There are several different models.
Fabric Guides - These guide the fabric for making a narrow, approx. ¼ inch , seam allowance. I do not use these guides. Just aline the edge of the fabric with the right side Pivot Point. This will result in an approximate ½ inch seam allowance.
Upper and Lower Blades - The fabric goes between these blue spring steel blades. They have very sharp points. Always pull the fabric away from you and to the left when removing it from the ruffler.To make a wider ruffle the lower blade can be removed. Tighten the little screw, after removing the lower plate, so it won’t vibrate out.
The trick to the ruffler is to play with it and learn what it can do for you. Just give it a try. There are lots of places on the internet that have more information about the ruffler.
Place the fabric to be ruffled between the blades. The fabric can be sheer and thin or thicker like poplin. Guide the right edge of the fabric on the pivot point. This will result in a half inch seam allowance. Hold the fabric very loosely. Let the ruffler have all the fabric it wants.
Don’t try to make the ruffle and sew it to the garment in one step. It can be done but it is much harder to keep track of two layers.
There are three adjustments that determine the amount of fabric in the ruffle.
First the Rack, every stitch, each 6th stitch or each 12th stitch.
Second the Pleat Size Adjustment, little bitty pleats that look more like gathers or deeper pleats that take up more fabric.
Third the Stitch Length Adjustment on the sewing machine. Changing the stitch length will change the distance between tucks. It is a combination of these factors along with the type of fabric that will determine the amount of fabric in the ruffle.
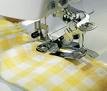
This picture shows the ruffler in action.
How Much Ruffle?
The amount of fabric in the ruffle is determined by the stitcher. Softer lighter fabrics can be ruffled more closely than stiffer thicker ones. A wider ruffle looks better if it is a bit fuller than a narrower one. Fabric cut across the grain ruffles softer than fabric that is cut the length of the grain. Bias cut ruffles are even softer. The type of hem treatment of the ruffle will make a difference. Rolled hem, serger edge or bias binding will change the look.The key is experiment.
How to make a certain length ruffle.
1. Take a scrap of fabric, from the project that is going to be ruffled. This piece should be about 16 inches long and as wide as the finished ruffle will be. Mark off 10 inches in the middle with a making pencil or chalk. Don’t leave pins in fabric that is being ruffled.
2. Ruffle the entire length of the fabric and if it does not look the way you want take out the thread and do it again with different settings. Adjusting the rack, the pleat size and the stitch length until you are satisfied. If the ruffle is too skimpy it will look cheap. If it is too tight it will be too heavy.
3. Measure the distance between the marks. If the distance between the marks is 5 inches your will need 10 inches of fabric to make 5 inches of ruffle. Divide the length of the ruffle you need by the ruffled number and multiply time 10 to get the length of fabric strip you need to ruffle.
Length needed ___ ÷ length between marks after ruffling ___ × 10
= ___length before ruffling
How to make a ruffle a certain length.
1. Measure the length of the piece that is going to be ruffled. That number will be X
2. Measure the piece that the ruffle will be attached to.That number will be Y
X ÷ Y = Z 10 ÷ Z = ______ the length of the test piece after ruffling
3. Take a scrap of fabric, from the project that is going to be ruffled. This piece should be about 16 inches long. Mark off 10 inches in the middle with a making pencil or chalk. Don’t leave pins in fabric that is being ruffled.
4. Ruffle this strip and measure between the marks. If it isn’t the right length, remove the thread, adjust the ruffler as needed and re-ruffle. It is always better for the ruffle to be a little bit too long rather than too short. Too long can be eased in, but too short will pucker.
My personal preference for square dance dresses is to leave the ruffler rack set on six, the depth adjustment as deep as it will go and just adjust the stitch length to change the amount of ruffle. Once you use a ruffler you will never go back to pulling threads.