
Materials
1. calculator - There are several calculations in these instructions. They are very basic and can be done with any simple calculator. Using these guidelines a perfectly fitted skirt can be made for any size dancer. There are instructions that have tables instead of calculations but those tables do not take into account all sizes.
2. paper and pencil to make a diagram
Instructions
There is no pattern needed for this type of skirt. The measurements from the diagram can be marked directly on the fabric.
1. Determine the hip radius - the hip radius will be used for calculations to ensure that the top tier will be full enough over the hip area. The top tier can be gathered into a fitted or elastic waist band.
hip measurement_____+ 2 inches =_____ ÷ 6.28 = _____hip radius
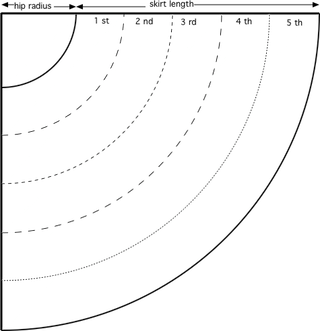
2. Decide on the skirt length _____ and the number of tiers _____.
Make a quarter circle diagram. This does not have to be to exact scale just make it big enough to write in the numbers. Once the calculations are done they can be used for another skirt.
Divide the length of the skirt by the number of tiers to get even depth tiers. The tiers do not have to be the same depth. If they are different depths the largest is usually on the bottom.
21 inch skirt length ÷ 3 tiers = 7 inch tier depth for equal tiers
or they could be 6 inches - 7 inches - 8 inches -or- 5 inches- 7 inches - 9 inches
21 inchskirt length ÷ 4 tiers = 5 ¼ inch tier depth for equal tiers
or- 3 ¾” - 4 ¾” - 5 ¾” - 6 ¾” -or- 3” - 4” - 5 ½” - 8 ½”
3. Draw in the number of tiers desired and write the depth of the tier on each section. This is just for figuring, it does not have to be perfect.
4. Calculate By following these formula the minimum length of each tier can be determined. The tiers can be a little longer than the minimum, but it is best if they are no more than 10 % longer than the minimum or the skirt will be heavy and fold into the petticoat.
a. hip radius_____+ depth of 1st tier_____ = radius of 1st tier_____
radius of 1st tier_____x 6.28 =_____ length of 1st tier
b. hip radius_____+ depth of 1st tier_____+ depth of 2nd tier_____ = radius of 2nd tier_____
radius of 2nd tier_____x 6.28 = _____ length of 2nd tier
c. hip radius___+ depth of 1st tier___+ depth of 2nd tier___+ depth of 3rd tier_____ = radius of 3rd tier_____
radius of 3rd tier_____x 6.28 = _____ length of 3rd tier
d. and so on for as many tiers as desired
5. Trims - Knowing the length of each tier allows calculation of the amount of lace or trim needed for the skirt. For one row of trim on each tier just add the lengths of all of the tiers and that will be the amount of trim to be purchased.
6. Lay out the fabric and measure the width. It is always best to cut off the selvage edges before cutting the fabric. The reason is the selvage edges are woven differently and tighter than the rest of the fabric. They tend to shrink and pucker when washed. This will be very apparent when the fabric has been washed.
7. Figure out how many widths of fabric will be needed to make the length of each tier. Depending on the length of each tier partial widths may be needed. When making uneven tiers layout the deepest tiers first. If there are any partial tiers left over they may be cut down to make partial tiers needed for the narrower tiers.
Measure the width of the fabric and subtract one inch for seam allowances. If all seam allowances are figured at ½ inch it is easier to do the math. Make this adjustment in the lay out not in the calculations or the size of the skirt will change.
length of tier ÷ width of fabric (usually 45 or 60 inches) = number of widths needed
8. Important - Add one inch to the depth of each tier for the seam allowances. If all seam allowances are figured at ½ inch it is easier to do the math. Add this inch in the lay out, not when figuring the depth of each tier or the size of the skirt will change.
9. Sew the depth (short sides) of the tier sections together so that each tier forms a circle. Press the seams open.
10. Embellishment - Now is the time to add any trim to the tiers. It is much easier to sew while the tiers are in long strips. When deciding on placement of trims always remember the ½ inch seam allowances. This is a great place to use some of the special embellishment feet that come with or can be purchased for a sewing machine.
11. Sew - The best sequence to put the tiers together is to work from the bottom up. The edges of the tiers must be divided in eight sections and those eight sections matched to the sections on the next tier. Mark the divisions with tailors chalk or pencil so that the edge can be run through the ruffler.
a. Starting with the bottom tier divide the upper edge in eight sections and measure the length between two marks.
b. Divide the lower edge of the next tier in eight sections and measure the length between two marks.
c. Take a piece of scrap fabric, from the skirt, and mark off a section the same length as one of the sections of the bottom tier.
d. Ruffle this piece and measure the results. The ideal finished measure when the ruffling is completed is ½ inch longer than the section of the next tier. Adjust the settings on the ruffler until the scrap ruffles correctly.
e. Ruffle all around the upper edge of the bottom tier.
f. Match the ruffled edge to the lower edge of the next tier and pin in place. The bottom tier will be a little larger than the next tier, this is good. Pulling gently on the upper tier and easing the bottom tier will create a better fit than if the bottom tier was to tight. This will also leave room for residual shrinkage. Pin the the tiers together.
g. Sew the tiers together with the ruffled edge against the feed dogs. They will help ease the longer edge into the shorter and this will reduce puckers.
h. Repeat this process for the remaining tiers, working from the bottom up.
This may seem like a lot of work but it is really just a different way of doing things. The ruffler makes the gathers between tiers much smoother and more even. The other way requires the same amount of marking and sewing a gathering stitch around the upper edge of the tiers. Then the gathering stitch must be pulled and the sections eased together. The gathering thread can break and the folds tend to get pushed and bunched toward each pin. Once people learn how to use the ruffler they would never make this type of skirt without using it. After making a couple of skirts the settings for the ruffler will be easy to figure out.
12. Extra lift can be added to the skirt by sewing mono-filament fishing line on the seam allowances of the tiers. Using a small zig zag stitch sew over 30 or 40 pound test fishing line on the smoother side of the seam allowance. This is a good place to use a couching foot if one is available. Otherwise use a regular presser foot and let the fishing line slip between the toes of the presser foot. Keep the fishing line close to the stitching line of the seam allowance.
13. Press the seam allowances between tiers toward the upper tier. Sewing on the right side of the skirt top stitch the seam allowances to the upper tier. Position the top stitching so that it does not go directly over the fishing line. This is a good place to use decorative stitches if the machine can make them or just use a straight stitch.
14. Attach this skirt to a Fitted Waistband or an Elastic Waistband depending on the preference of the wearer. The top edge of the first tier will have to be gathered to fit the waist band.
15. Finish the hem with a rolled hem or a serged edge. Remember that there is only a ½ inch in the calculations for the hem. If a larger hem is wanted it must be figured into the layout of the bottom tier before it is cut.