
Elastic waistbands are potluck forgiving and easy to make. Instead of stitching the elastic to the fabric of the waistband, make a casing and slide the elastic through the tunnel. When our closet gets too full we pass our experienced outfits to new dancers. The most common problem with experienced clothing is that the elastic has relaxed. Alterations and replacement of the elastic is easy if it is in a casing. In commercially made skirts the elastic waistband may have several rows of stitching. This can be removed with a sharp seam ripper and a lot of patience. It is much easier to cut off the old and make a new elastic waistband.
The length of the new waistband should be, at minimum, two inches larger than the hip measurement. This gives just enough ease to get into the skirt without difficulty. The waist edge of the skirt may be a little larger than the waistband, it can not be smaller. Gather the waist edge of the skirt to fit the waistband as needed. The width of the waistband is an individual choice. Usually between 1 ½ to 3 inches. If it is smaller than 1 ½ inches the tightness needed to keep the skirt from spinning can cause the elastic to cut into the body. Waistbands over three inches wide tend to roll.
There is no magic number for the length of elastic in a waistband. There are many variables to consider. One, types of elastic. They have different amounts of stretch. Two, waistband fabric. Thicker fabric requires more pull. Three, length of the unfinished waistband compared to the finished length. Four, weight of the skirt. Elastic must work harder to hold up a heavy skirt. Five, most importantly, how you like your waistband to fit. Some people like it very snug and secure. Others want it just tight enough to keep the skirt from spinning. Elastic must be tried on for the perfect fit.
Always try on the finished waistband with a full set of the garments you are going to be wearing. Panties, pantyhose, pettipants, blouse, and crinoline all change the diameter of the waist and the fit of the waistband. After the first dance more adjustments may be needed. What felt right in the sewing room may be too tight to wear it all night. Or it might need to be tighter, when with every spin the front slides around to the side.
My favorite waist band is three rows of ½ inch elastic. Three rows working together make a more comfortable waistband than one row pulling hard.
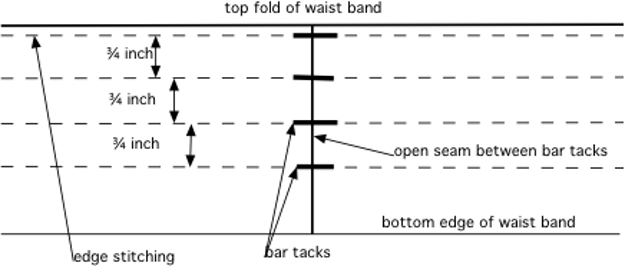
A single elastic waist band will be more comfortable if ban-roll or non-roll elastic is used. Stitching the top fold of the waistband ¹⁄₈ inch down from the edge will give a crisper look to the waistband and help to keep the elastic from rolling. The width of the tunnel should be ¼ inch wider than the elastic to allow room for the thickness of the elastic and to allow the elastic to move in the tunnel when dressing.
An easy way to shorten a skirt is to take off the waistband and cut the skirt down from the top. The waist edge of the skirt will be bigger and gather into the waistband more, but it is easier than messing with all the ruffles on the hem. The new waistband does not have to be the same color as the skirt or even the same fabric. A contrasting color will look like a belt, especially when a large broach is pinned to the front for a buckle.
Belts should be added as an accent to the waistline and not as a means of keeping the skirt on. If the waistband is a perfect fit you will be comfortable and more secure on the dance floor. You should not have to think about your clothing as you dance the night away.