
This template is designed to be traced to make patterns for full circle skirts.
These are the instructions on the template.
Do not make this type of skirt out of soft gauze type fabric or knits. The bias of the fabric will stretch.
The fabric should be tightly woven, with a nice soft drape to move on the dance floor.
Materials for tracing
Pattern Paper - approximately 1¼ yards per skirt depending on the length.
The paper should be approximately 44 inches wide or it may need to be pieced.
Suggested types are:
Dotted Pattern Paper - MoodFabrics.com
Pellon® True Grid 801 or Pellon®Easy Pattern 830 or Red Dot Tracing Material 815
HTC Retail® Red Dot Tracer 3210-1 or Pattern-Ease
Colored pencils - Markers will bleed through some types of pattern paper
Painter's Tape - Scissors - Tape Measure - Yardstick
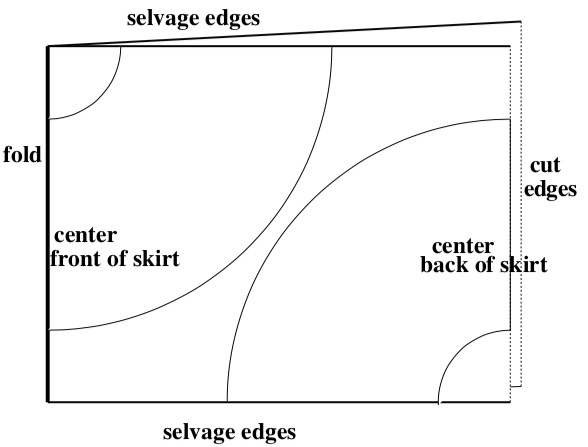
Basic Instructions for a 4 panel skirt
Lay the template on a flat surface and tape the corners down. Observe all curved lines are ½ an inch apart. At the ends of the curved lines are the straight stitching lines and cutting lines.
Layout
Lay the tracing paper on this template. Position the tracing paper so the straight cutting lines are aligned with the tracing paper marking. Tape the tracing paper’s corners down.
Trace the straight solid cutting lines using solid lines and the dashed straight stitching lines using dashed lines.
Waist - 'Personal Circumference'
For a skirt with an elastic waist band use the largest body measurement, either hip or waist plus 2 inches. For a skirt with a solid waist band or attached to a bodice use the waist measurement plus 2 inches. The additional 2 inches are for design ease. This number is your Personal Circumference.
Trace the curve that is closest to the personal circumference number on the template with a dashed line. This will be the waist stitching line of the patten. The personal circumference is also the length to make the waist band.
Trace the curve that is ½ inch smaller on the template with a solid line. This will be the waist cutting line.
Hemline
Measure from the dashed waist stitching line to the desired skirt length and trace this line with dashes. It will be the hem stitching line. Trace the curve that is ½ inch larger with a solid line and it will be the hem cutting line for the pattern.
Making two identical patterns will help with layout.
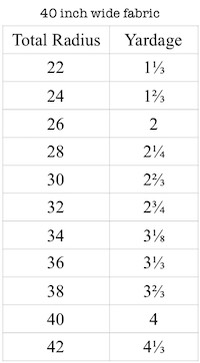
At the end of the cutting line is an inch measurement. This number will be the Total Radius for calculating yardage requirement.
Yardage & Layout
These yardages are approximate. They were calculated for 40 inch wide and 56 inch wide fabric. The end of the bolt usually says 44/45 inches or 60 inches. Actual measurements are very often different.
If the total radius is 20 inches or less, 1⅛ yards of 40 inch wide fabric can be folded into quarters and the waist line cut from the folded point.
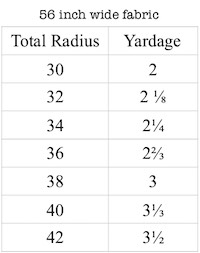
If the total radius is 28 inches or less, 1⅔ yards of 60 inch wide fabric can be folded into quarters and the waist line cut from the folded point.
Hems - The ½ seam allowance at the bottom edge of the skirt allows a rolled hem to be made with either the serger or sewing machine. Using fishing line in the rolled hem will make the skirt stand out better and keep the edge crisper.
Bias Hem Facing on a Circle Skirt
This makes a nice smooth hem that is easy to sew.
To make a bias hem facing, increase the 'Total Radius' by 2 inches. To do this just draw another cutting line, on the pattern, that is 2 inches larger than the true hem cutting line. Remember - This will increase the yardage requirement. If the hem facing is more than 2 inches wide it will tend to pucker and be more difficult to sew.
1. Cut out the skirt and the hem facing. Leave the hem facing attached to the pattern paper until the skirt seams are done. When working with a bias strip of fabric always treat it gently. There is something about a long piece that makes people want to pull on it 'to get it nice and smooth'. This will stretch out the strip and then it will shrink back when washed.
2. Sew the side seams and sew the ends of the facing together. Just make 2 seams, leave the third cut open. Press the seams open.
3. Lay the facing on the skirt, right sides together. Starting at one end sew the facing to the skirt with a ½ inch seam allowance. The facing will be longer than the skirt. When you get all the way around, over lap about an inch and cut the excess off.
4. Press the seam allowance toward the hem facing.
5. Under stitch the seam allowance to the hem facing. For an extra lift to the skirt use a 2 mm wide by 4 mm long zigzag stitch and sew over 25 pound test fishing line.
The fishing line must come off the spools straight, like toilet paper. Do not set the spool on its flat end and put the fishing line off in a spiral. This will cause the line to twist on the skirt.
Keep the line loose. Sometimes the fabric will gather on the fishing line. Stop sewing, hold the fish line and chase the gathers toward the presser foot, pulling more fish line to back. DO NOT pull too hard or the hem of the skirt may become stretched out. Most of the hem is on the bias, so it stretches easily.
6. Press the hem facing to the skirt. Press hard with steam. The hem facing and skirt edge have been stretched out by the understitching. They need to shrunk back into place. Use a lot of school glue stick, don’t be stingy. Glue will hold the hem facing in place better than pins.
Using school glue stick will not hurt your machine. I learned this trick while working in a sewing machine repair shop. We never had a machine damaged by glue stick. The iron will dry the glue. If a mistake is made just spray it with water, peel it up try again.
There is no need to finish the upper edge of the facing because it is on the bias, it will not string out. Trying to turn under this edge, serge or zig zag it will stretch it out.
7. Sew the hem. I use invisible thread in both the bobbin and top. Increase the stitch length to 5 mm and decrease the tension to one. Click HERE for Invisible Thread info I sew about ¼ inch from the top edge, ½ inch up from the bottom and sometimes, right down the middle of the hem facing.
If anyone can see the invisible thread, you aren’t dancing fast enough.