
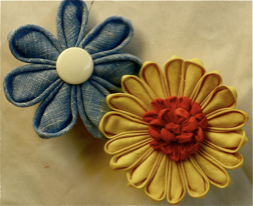
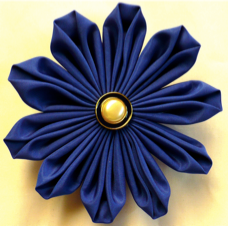
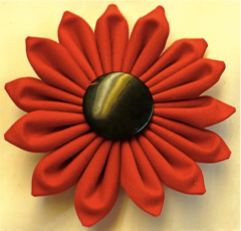
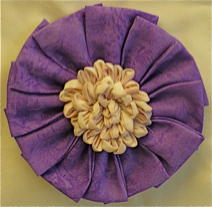
Fun Fancy Folded Fabric Flowers
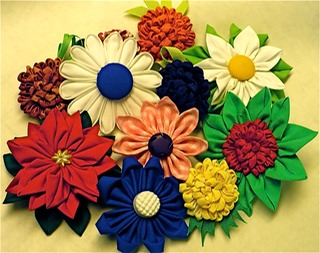
These flowers are very simple project that can be made in many sizes from different fabrics. They can be used as hair ornaments, hat trims, garment pins or home decor items. Once you have made a few you will see the potential and take off in many directions. Thicker fabrics are better for larger petals and thinner fabric for smaller ones.
Materials
Fabric squares - Can be any size from 3 inches on up. At least 5 squares are needed for small flowers. The number of petals will depend on the effect you are trying to achieve. Different types of fabrics change the petals dramatically. Different folds change the size of the petals.
Strong thread - carpet or upholstery type thread. Must be strong to resist breakage.. The color doesn’t matter because it will not show. Have a needle with about 12 inches of thread ready for each flower.
Large needle - about 3 inches long with a large eye for the heavy thread.
Pliers or hemostats - to pull the needle through the folded fabric
Scissors
Hot glue gun and glue sticks
Scraps of felt - for the backs

Jewelry pins or hair clips - to attach to the backs
optional - steam iron if you would like to press the folds for a sharper effect.
Instructions
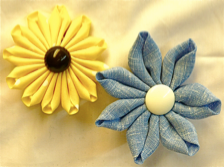
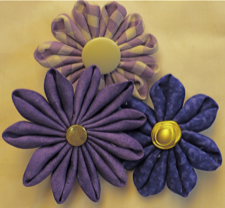
Variation A
1. Lay the fabric square on the table, prettyside down in a diamond
shape. Bring the top corner down to the bottom corner.
2. Bring the two outer corners to the bottom corner.
The folded corner at the top is the most important.

Keep it smooth and neat. The bottom corners will be cut off later.
3. Turn the petal over so the folds are on the bottom.
4. Bring the upper folded edges to the middle
5. Turn the petal over again and bring the two side corners up and together.
6. Choose which side of the petal will be the face side
of the flower. Either side can be used, just be sure to use the same side for the entire flower.


Option ➀ - Jab the threaded needle through the upper corner of the center folds being sure to catch all of the layers. Cut off the raw edges even with the
middle corner.
Option ➁ - Turn the petal over and jab the needle through the other corner being sure to catch all layers. Cut off the raw edges even with the middle corner.
7. Make more petals using the same Option fold. Slid the petals down the thread until several are in place. Tie the ends of the thread together and pull snug. The ends of the petals should meet in the middle of the flower.
8. Place the flower face down on a smooth surface that hot glue will not adhere to like a teflon sheet or a glass plate. Arrange the petals evenly and fill the hollow in the back of the flower with hot glue.
9. Cut a small circle of felt to cover the hollow in the back of the flower and glue/sew it in place. Glue/sew a button or beads to the center front. Glue/sew a jewelry pin or a hair clip to the felt, or attach it to a project. Leaves can be made
of fabric or ribbon.
Variation B
1. Lay the fabric square on the table, pretty side down. Bring the top corner down to the bottom corner.
2. Bring the two outer corners to the bottom corner. The folded corner at the top is the most important. Keep it smooth and neat. The bottom corners will be cut off later.
3. Flip the petal over so the folds are on the bottom.
4. Bring the upper folded edges to the middle.
5. Leave the petal this side down on the table and bring the outer corners up and together.
6. Choose which side of the petal will be the face side of the flower. Either side can be used, just be sure to use the side for the entire flower.

Option ➀ - Jab the threaded needle through the upper corner of the center folds being sure to catch all of the layers. Cut off the raw edges even with the middle corner. Look inside the folds to see where to cut.
Option ➁ - The Daisy -Turn the petal over and jab the needle through the other corner being sure to catch all layers. Cut off the raw edges even with the middle corner. Look inside the folds to see where to cut.
7. Make more petals using the same Option fold. Slid the petals down the thread until several are in place. Tie the ends of the thread together and pull snug. The ends of the petals should meet in the middle of the flower.
8. Place the flower face down on a smooth surface that hot glue will not adhere to like a teflon sheet or a glass plate. Arrange the petals evenly and fill the hollow in the back of the flower with hot glue.
9. Cut a small circle of felt to cover the hollow in the back of the flower and glue/sew it in place. Glue/sew
a button or beads to the center front. Glue/sew a jewelry pin or a hair clip to the felt or attach it to a project. Leaves can be made of fabric or ribbon.
Variation C
1. Lay the fabric square on the table, pretty side down. Bring the top corner down to the bottom corner.
2. Bring the two outer corners to the bottom corner. The folded corner at the top is the most important. Keep it smooth and neat. The bottom corners will be cut off later.
3. Do NOT turn over. Fold the upper edges to meet in the middle of the petal.
4. Flip the petal over and bring the outer corners up and together.
5. Choose which side of the petal will be the face side of the flower. Either side can be used, just be sure to use the side for the entire flower.


Option ➀ - Jab the threaded needle through the upper corner of the center folds being sure to catch all of the layers. Cut off the raw edges even with the middle corner. Look inside the folds to see where to cut.
Option ➁ - Turn the petal over and jab the needle through the other corner being sure to catch all layers. Cut off the raw edges even with the middle corner. Look inside the folds to see where to cut.
6. Make more petals using the same Option fold. Slid the petals down the thread until several are in place. Tie the ends of the thread together and pull snug. The ends of the petals should meet in the middle of the flower.
7. Place the flower face down on a smooth surface that hot glue will not adhere to like a teflon sheet or a glass plate. Arrange the petals evenly and fill the hollow in the back of the flower with hot glue.
8. Cut a small circle of felt to cover the hollow in the back of the flower and glue/sew it in place. Glue/sew a button or beads to the center front.Gluesew a jewelry pin or a hair clip to the felt or attach it to a project. Leaves can be made of fabric or ribbon.
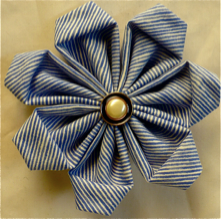
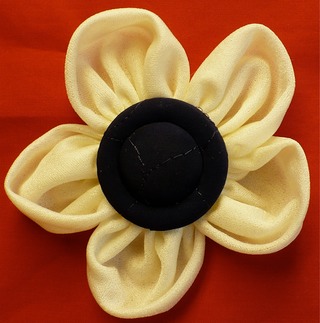
Square Petals
1. Lay the square pretty side down on the table.
2 Fold the right side of the square in to just a little past the mid line. Fold the left side in so that it laps over the right about an 1/8 inch.
3. Fold the top down to meet the bottom.
4. Sew across the bottom of the petal with large (1/4 inch) stitches about 1/8 inch from the bottom.


5. The petals can be over lapped about half way while sewing to make a tighter flower.
6. When there are enough petals on the thread pull it tight and tie the ends of the thread together.
7. Place the flower face down on a smooth surface that hot glue will not adhere to like a teflon sheet or a glassplate. Arrange the petals evenly and fill the hollow in the back of the flower with hot glue.
8. Cut a small circle of felt to cover the hollow in the back of the flower and glue it in place. Glue a button or beads to the center front. Glue a jewelry pin or a hair clip to the felt or sew it to a project. Leaves can be made of fabric or ribbon.
Prairie Points
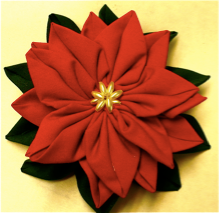
The instructions make a poinsettia. Once you have the technique this flower can be made with any size points and as many rows as you desire. Try different types of fabric, or colors and leave the prairie points unpressed for a softer effect.
1. Cut 27 - 3 inch squares of fabric. The bottom row is 11 green squares. The second row is 9 red squares and the top row is 7 red squares. Cut a 2 1/2 inch circle of felt for the backing.
2. Press the squares in half wrong sides together. Bring the corners of the fold down so that the fold meets in the middle and all raw edges line up. Press. This forms a prairie point triangle.
3. With 18 inches of strong thread, hand stitch about 1/4 inch from the raw edges of the first 11 green squares. Using about 1/4 inch stitches. Being careful to have the center folds of the prairie points all facing up.
4. As you stitch pull the thread to gather, but not too tight. Bring the first petal to the last petal to make a circle that is a little smaller than the edge of the felt. Secure the circle of petals by stitching the last to the first one. Stitch this row to the felt.
5. Repeat the circle with 9 red points. Pull to gather so that they fit just inside the green. Stitch in place.


6. Then gather the 7 reds to make the top layer. Pull tightly and stitch in place.
7. The center can be filled with beads or a button or strands of yarn.
8. To change the look of this flower the other side of the petal can be used. It can also be used as a leaf shape behind or with other types of petals.
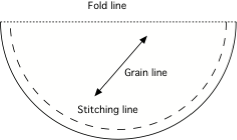
Circle Variation
This type of petal works best in very soft thin fabrics that gather easily.
1. Thread the needle with about 12 inches of thread.
2. Instead of squares cut circles of fabric for petals.
3. Fold the circles wrong side together along the bias. The bias gathers better and makes softer petals than fabric folded on the grain.
4. Stitch around the edge of the petal about 1/8 inch from the edge. Use large 1/4 inch stitches. Sew several petals in succession.
5. Slid the petals down the thread until several are in place. Tie the ends of the thread together and pull snug. The ends of the petals should meet in the middle of the
flower.
6. Place the flower face down on a smooth surface that hot glue will not adhere to
like a teflon sheet or a glass plate. Arrange the petals evenly and fill the hollow in the back of the flower with hot glue.
7. Cut a small circle of felt to cover the hollow in the back of the flower and glue it in place. Glue a button or beads to the center front. Glue a jewelry pin or a hair clip to the felt or sew it to a project. Leaves can be made of fabric or ribbon.
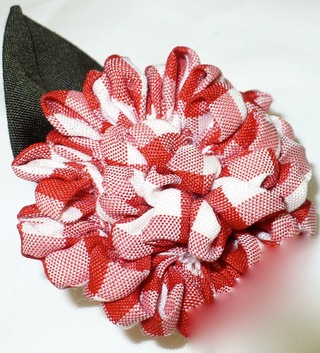
Coin Ruching
This is an old technique that makes a chrysanthemum type flower. The size depends on the size of the fabric strip. These instructions are for a three inch flower. Larger flowers can be made by adding a second strip or making the strip wider.
Coin ruching was originally done by tracing half circles around a coin. This finished flower will be about 2 inches in diameter.
1. Cut a fabric strip 1 1/2 inches wide by width of the fabric. The length of the fabric strip determines the size of the flower. Cut off the salvage edges.
2. Fold strip in half length wise wrong sides together. This can be pressed or unpressed. It is now 3/4 inch wide. Use the longest basting stitch, machine sew about 1/8 inch from the raw edge.
3. Using the end of a thread spool, or another object that is about one inch in diameter, draw half circles along the strip of fabric. The marks will not show when the flower is finished

4. With 24 inches of strong thread, hand stitch around each half circle, using about 1/4 inch stitches. At the top of the half circle bring the thread over the fold of the fabric to shape the petals. As you stitch pull the thread to gather, but not too tight.
5. After the stitching is complete start rolling the petals from one end. Stitch the base of the petals together as you roll. Position each new round 1/8 to 1/4 inch higher than the previous round. Stitch deeply into the raw edge of the petals.
6. To make a leaf, stitch along the raw edge of the prairie point and pull to gather. Sew the prairie point to the base of the flower.(Leaves can be made from ribbon.)
7. Then cover the back with the circle of felt by whip stitching around the edges, or hot glue in place. Glue/sew a pin or hair clip to the back or attach it to your project.